
Has your area recently been pelted by a hailstorm? While hail can make for a pretty sight when it’s bouncing around, it can also be a roof’s worst nightmare. Those little ice pellets can cause some serious damage, and it’s not always easy to spot. But don’t worry, we’re here to help you become a roof hail damage expert!
Need quick and efficient storm damage roof repair?
Here’s what’s in this article:
- The 5 primary steps to follow for identifying hail damage
- 5-part process to handling insurance claims for roof damage
- Tips + tricks for making your roof less susceptible to hail damage
Read on to learn everything you need to know about how to accurately spot hail damage on your roof shingles!
Why Is Hail Damage a Big Deal?
Before we dive into the nitty-gritty of identifying hail damage, let’s talk about why it’s such a big deal. Hail can wreak havoc on your shingle roof in several ways:
- Granule Loss: Hail can knock granules off your shingles, leaving them exposed and vulnerable.
- Cracks and Bruises: The impact of hail can cause cracks or bruises in the shingles, compromising their integrity.
- Water Infiltration: Damaged shingles can lead to water leaks, which can cause extensive interior damage if left unchecked.
- Reduced Lifespan: Hail damage can significantly shorten the lifespan of your roof if not addressed promptly.
The 5 Steps You Should Follow to Identify Hail Damage
Now that you know why it’s essential to identify and address hail damage, let’s get into the 5 main steps to follow for how to spot it.
Step 1: Ensure Your Safety First 🛟
Before you climb up onto your roof to inspect for damage, remember to prioritize safety. If you’re not comfortable with heights or using a ladder, it’s best to leave this task to a professional. Safety should always come first!
Step 2: Start with a Ground-Level Inspection 🕵️
Start with a visual inspection from the ground. Look for signs of hail damage without risking life and limb. Here’s what to check for:
- Dented Gutters and Downspouts: Hail can dent metal gutters and downspouts, indicating the severity of the storm.
- Damaged Window Screens: Check if your window screens have holes or dents from hail impact.
- Dents on Vehicles: If your car was parked outdoors during the storm, check for dents on the hood or roof.
If you notice damage to these areas, it’s a good indicator that your roof might have taken a beating as well.
Step 3: Do a Thorough Roof Inspection 🔍
Now, let’s move on to the roof itself. If you’re comfortable with it and it’s safe to do so, climb up using a ladder. Remember to follow proper ladder safety guidelines. Once you’re up there, here’s what to look out for:
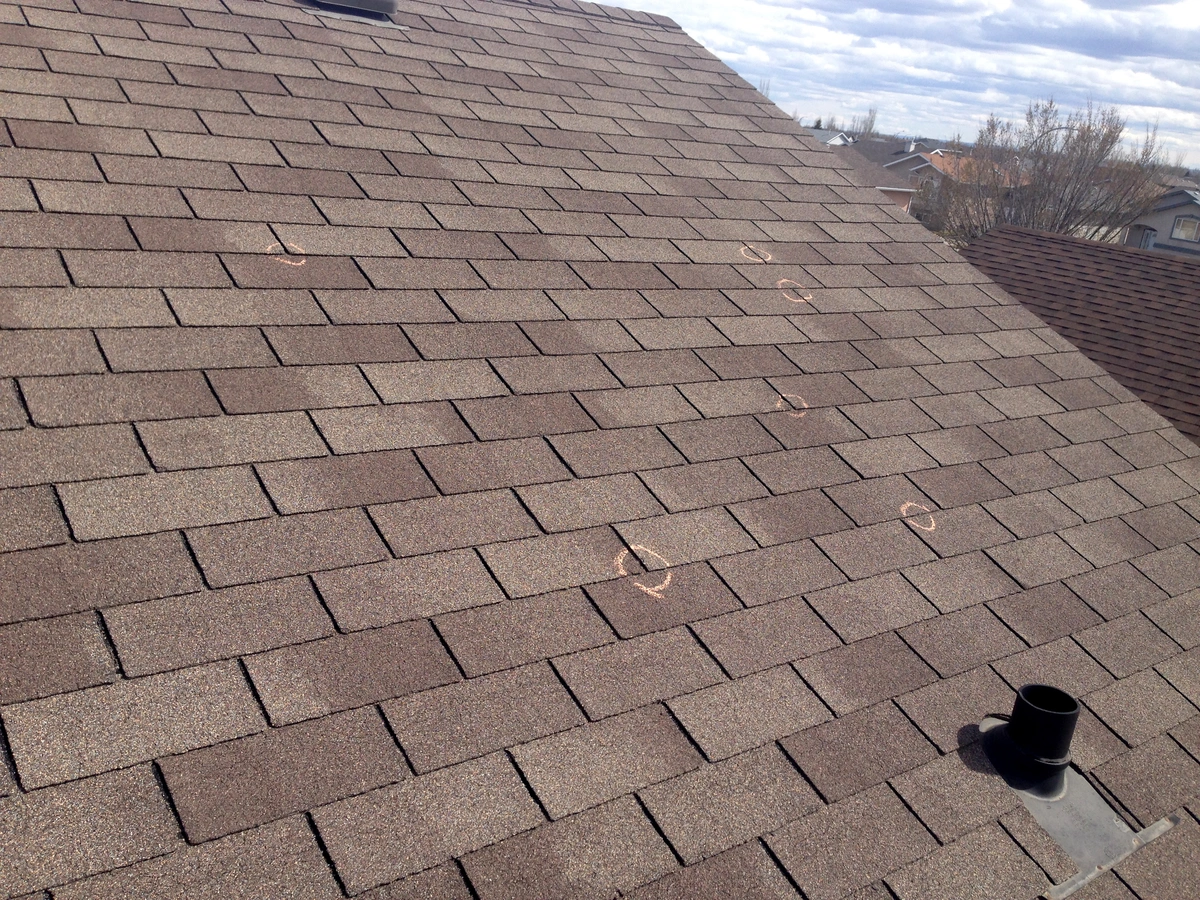
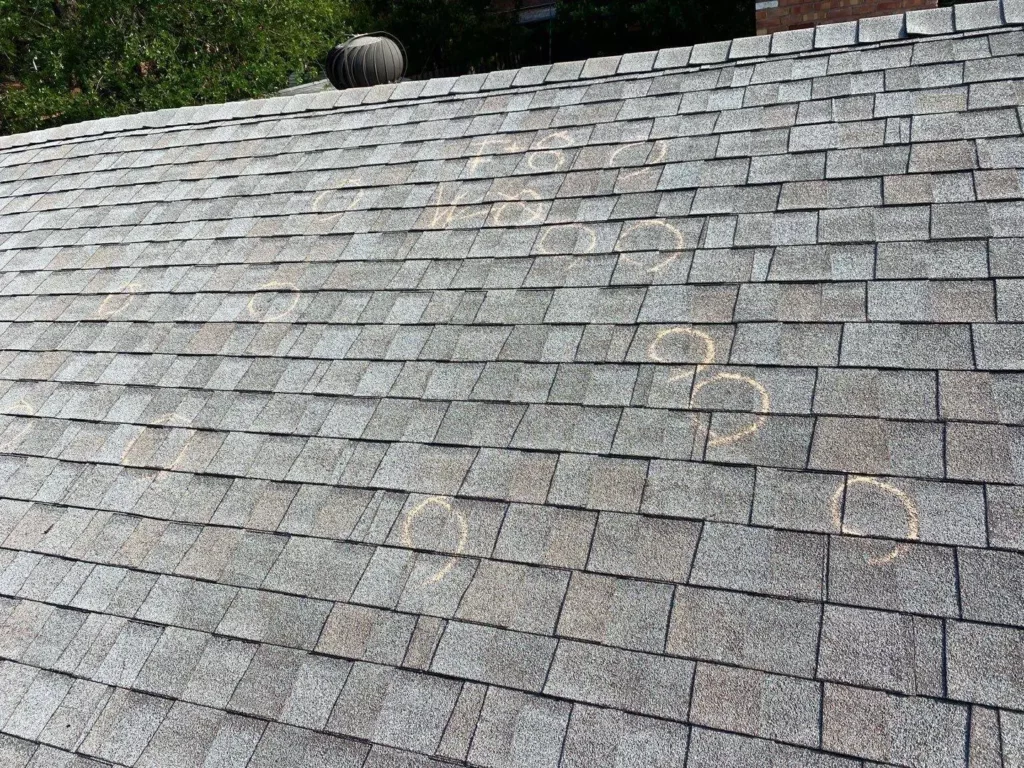
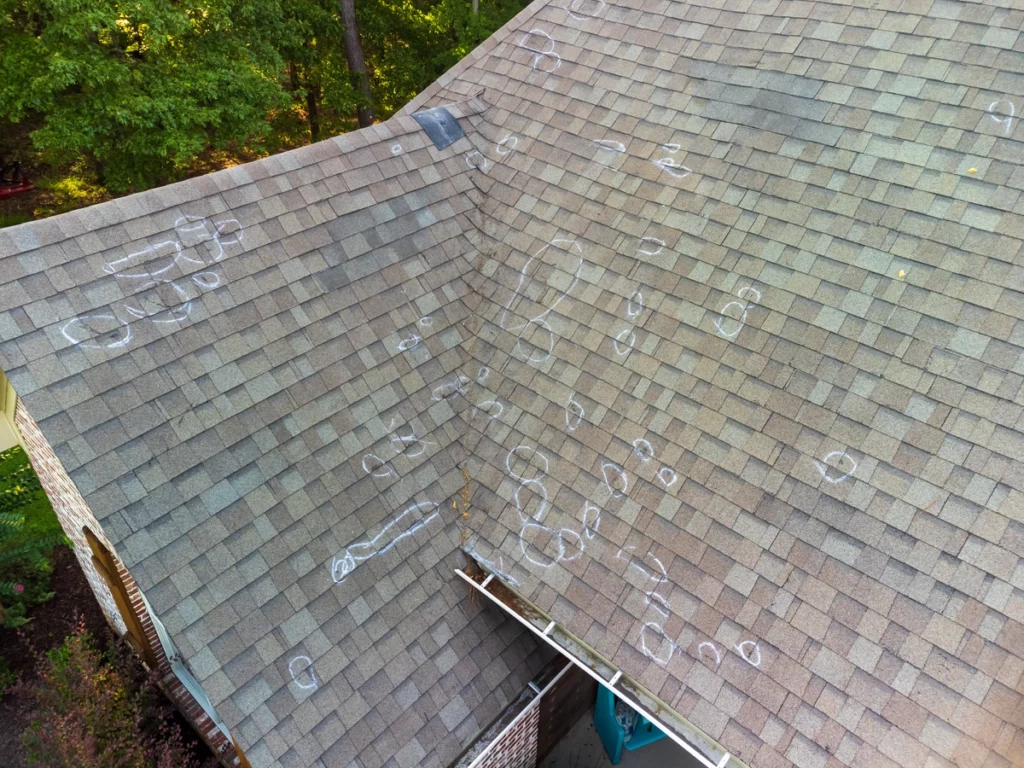
- Damaged Shingles: Inspect the shingles closely for signs of hail damage. Look for cracks, dents, or bruises. Damaged shingles may have missing granules or exposed fiberglass mat.
- Circular Patterns: Hail damage often creates circular or dimpled patterns on the shingles.
- Soft Spots: Press down gently on the shingles. If they feel soft or spongy, it’s a sign that the hail may have compromised the shingle’s integrity.
- Check Metal Components: Examine any metal components on your roof, such as vents, flashing, and chimney caps. These can also show signs of hail damage, like dents or dings.
Step 4: Document all of the Hail Damage 📸
If you find evidence of hail damage, it’s crucial to document it thoroughly. Take clear photos of the damaged areas, making sure to capture close-ups of the affected shingles and any visible circular patterns. These photos will be essential for insurance claims or when consulting with roofing professionals.
Step 5: Contact a Roofing Professional 👷
While you can identify some hail damage yourself, it’s advisable to have a roofing professional assess the extent of the damage. They have the experience and expertise to provide a comprehensive evaluation. Plus, they can recommend the necessary repairs or replacement, and their assessment can be valuable when dealing with insurance claims.
5 Steps for Dealing with Insurance Claims
If you’ve discovered significant hail damage on your roof, you may need to file an insurance claim to cover the repair or replacement costs. Here are 5 steps to follow:
1. Review Your Policy
Carefully read your homeowner’s insurance policy to understand what is covered and what your deductible is.
2. Document the Damage
As mentioned earlier, take clear photos of the hail damage and keep any related documentation, such as inspection reports.
3. Contact Your Insurance Company
Notify your insurance company as soon as possible to initiate the claims process. They will guide you through the next steps.
4. Schedule Repairs
Once your claim is approved, work with your roofing contractor to schedule the necessary repairs or replacement.
5. Follow-Up
Stay in contact with your insurance company and contractor throughout the process to ensure everything goes smoothly.
Hail Damage Repair or Replacement Costs
The cost of repairing or replacing a hail-damaged roof can vary widely depending on the extent of the damage, the roofing materials used, and your location. Here’s a rough estimate to give you an idea:
- Minor Repairs: If the damage is relatively minor and limited to a few shingles, you might be looking at a few hundred to a couple of thousand dollars.
- Partial Replacement: If a larger portion of your roof is damaged, a partial replacement may be necessary, which can cost anywhere from $2,000 to $8,000 or more.
- Full Replacement: In severe cases where the entire roof needs replacing, costs can range from $5,000 to $15,000 or more, depending on the size of your home and the roofing materials chosen.
Preventing Future Hail Damage
Even though you can’t boss around Mother Nature, there are some tricks up your sleeve to give your roof a fighting chance against hailstorms. First off, think about getting yourself some impact-resistant shingles. These bad boys are built to take a beating and can handle hail way better than your standard shingles. Next up, don your inspector hat and give your roof some regular TLC. Regular roof check-ups might sound like a chore, but they can help you spot and squash small problems before they balloon into major wallet-drainers.
Another important aspect that most homeowners overlook is trees. If you’ve got trees hanging out around your roof, give ’em a trim. Overhanging branches can play a dangerous game during a storm and drop hail bombs on your shingles. A little tree TLC can save you from some serious roofing woes.
And last but not least, think about adding some hail guards to the vulnerable spots on your roof, like skylights or vent pipes. These are like shields for your roof, giving it an extra layer of protection against hail’s fury.
Here’s to a Hail-Free Future for Your Home!
Identifying hail damage on your shingle roof is essential for maintaining the integrity of your home and preventing further issues. By following the steps outlined in this guide, you can become a savvy roof hail damage detective, protecting your home and your investment. Remember, when in doubt, consult with a roofing professional to ensure your roof remains in top shape.
Click here to contact our expert team of roofers at Clean Cut today to get a quick estimate for your new roof!