Many homeowners dread the havoc that hailstorms can wreak on their roofs. Hail damage often goes unnoticed until it leads to more significant issues like leaks and structural problems. This guide is here to help you understand and manage hail damage roof repair efficiently. Whether you’re dealing with minor dents or more severe destruction, we’ll walk you through every step to ensure your roof is restored to its best condition.
- Understanding hail damage
- 8 steps to repair a roof with hail damage
- Maintenance tips to prevent future damage
🤔 Understanding Hail Damage
Hailstones can range from pea-sized to as large as a baseball. The larger the hail, the higher the potential for damage. But even smaller hail can cause significant wear and tear over time, especially when accompanied by strong winds.
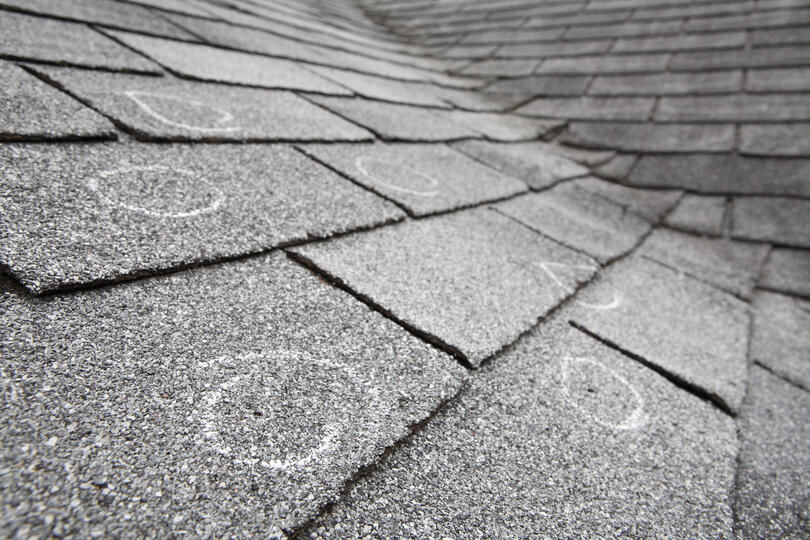
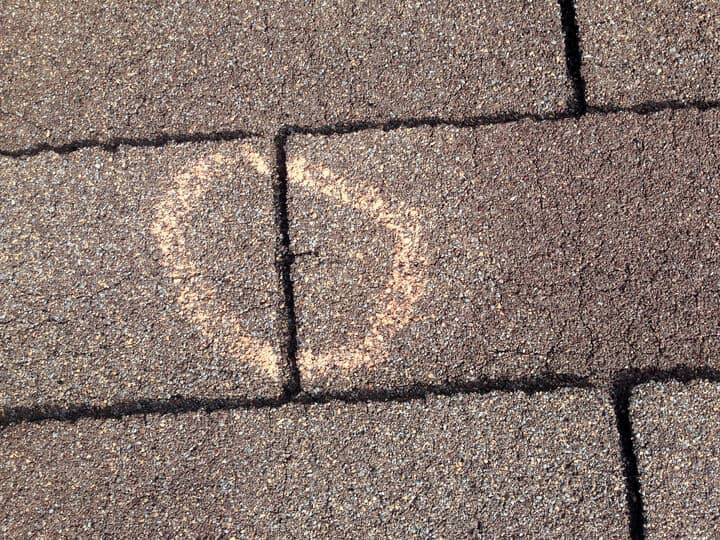
What Does Hail Damage Look Like?
Hail damage can manifest in several ways:
- Dents and Dings: Small, circular dents in shingles or metal roofing.
- Cracked Shingles: Look for splits or cracks, especially on asphalt shingles.
- Granule Loss: Asphalt shingles may lose their granules, which can accumulate in gutters.
Why Is Hail Damage Severe?
Ignoring hail damage can lead to several severe consequences. Water can seep through cracks, resulting in leaks that cause interior damage. Additionally, compromised shingles may weaken the roof structure, leading to faster deterioration and a reduced lifespan for the roof. Furthermore, water infiltration can promote mold growth, which poses health risks to occupants.
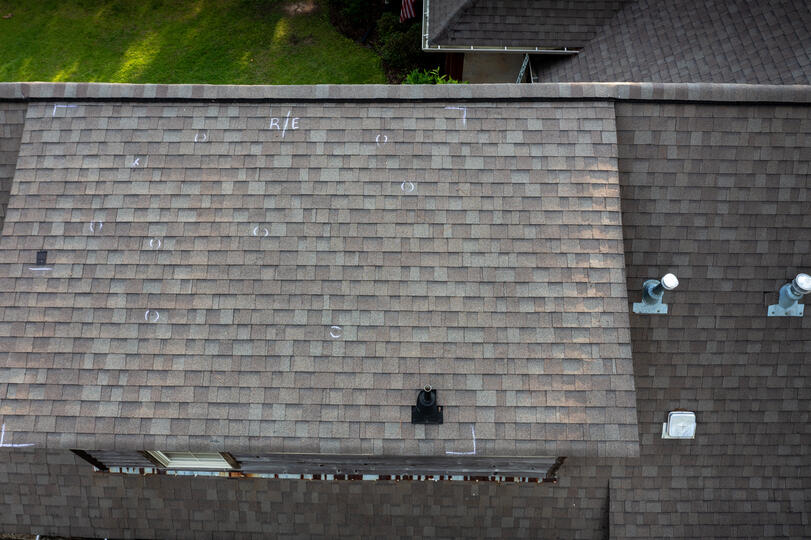
Assessing the Extent of Damage
Before rushing to repair, it’s crucial to assess the damage accurately. This involves both a visual inspection and sometimes a professional assessment.
Visual Inspection
Start with a simple walk-around:
- Check for visible dents and cracks.
- Examine gutters for granule loss.
- Look at other areas like skylights and vents for signs of impact.
Professional Assessment
After a hailstorm, hiring a professional roofer is crucial to assess the damage to your roof. These experts conduct comprehensive inspections to identify not only visible damage but also underlying issues that may not be immediately apparent. They provide a detailed report outlining the extent of the hail damage, including potential risks to your home’s structure and energy efficiency.
Additionally, a professional assessment can help you understand your repair options and associated costs. Experienced roofers can guide you through the insurance claims process, ensuring that you receive the compensation you deserve for repairs. Their expertise ensures that the work is done safely and to code, ultimately protecting your investment and maintaining the integrity of your home.
🛠️ 8 Steps to Repair a Roof with Hail Damage
Repairing a roof with hail damage is crucial to prevent further structural issues and water leaks that can lead to costly repairs. Timely action ensures the safety and integrity of your home while maintaining its value.
1. Safety First
Before you even think about climbing onto your roof, make safety your top priority. Equip yourself with high-quality safety gear, including non-slip shoes to prevent slipping on shingles, durable gloves to protect your hands, and a sturdy ladder that can safely support your weight. Consider using a safety harness attached to a secure anchor point on the roof for added protection. Additionally, check the weather conditions to avoid working in rain or high winds, which can increase the risk of accidents.
2. Document the Damage
To ensure a smooth process with your insurance company, document all hail damage thoroughly. Use a good-quality camera or smartphone to take clear, detailed photos of every affected area, including shingles, flashing, and any other components of the roof that are damaged. Make sure to capture images from multiple angles and distances. Keep a written record of all damage, including dates and descriptions, as this will be invaluable during the claims process.
3. Temporary Fixes
While waiting for professional repairs or the insurance adjuster, it’s important to take immediate action to prevent further damage. Use tarps or plastic sheeting to cover any exposed areas of your roof. Secure these temporary fixes with roofing nails or heavy weights to ensure they stay in place during wind and rain. This will help prevent water from seeping into your home, which could cause additional damage to your interior and structure.
4. Remove Damaged Shingles
Once you’re ready to proceed with repairs, carefully remove the damaged shingles using a pry bar. Start at the edges and work your way in, being cautious not to disturb the surrounding shingles. If the shingles are particularly stubborn, gently tap the pry bar underneath them to loosen their adhesive. Be sure to discard the damaged shingles properly, as many areas have regulations regarding roofing materials.
5. Install New Underlayment
After removing the damaged shingles, it’s time to install a new underlayment. This material acts as a barrier against moisture, providing additional protection for your roof deck. Lay the underlayment evenly, overlapping each row to ensure full coverage. Secure it in place with roofing nails, paying attention to the manufacturer’s instructions for the best results. This step is crucial for enhancing your roof’s durability and resistance to future weather events.
6. Lay Down New Shingles
With the underlayment in place, you can now lay down new shingles. Start at the bottom edge of the roof and work your way up, ensuring that each new shingle aligns perfectly with the existing ones. Secure them with nails, following the recommended nailing pattern to ensure they are properly anchored and create a watertight seal. Pay careful attention to the manufacturer’s installation guidelines to maintain your roof’s warranty and ensure optimal performance.
7. Seal the Edges
After the new shingles are installed, apply roofing sealant along the edges and seams. This step is critical in preventing wind uplift and water penetration, especially at vulnerable points such as ridges and valleys. Use a caulking gun for precise application, and ensure that the sealant is evenly distributed and adequately covers all exposed areas. This added layer of protection can extend the lifespan of your roof and help it withstand harsh weather conditions.
8. Inspect and Clean Gutters
Finally, complete your repair process by inspecting and cleaning your gutters. Clear out any debris, leaves, or granules that may have accumulated, as these can obstruct proper drainage and lead to water damage. Check for any signs of damage to the gutters themselves and consider making repairs if necessary. Ensuring that your gutters are in good condition is vital for directing water away from your roof and foundation, ultimately protecting your home from future issues.
💡Preventative Maintenance Tips for Hail Damage Roofs
Preventative maintenance for hail-damaged roofs is crucial to extend their lifespan and avoid costly repairs. Regular inspections and timely interventions can help identify vulnerabilities, ensuring your roof remains strong and protective against future weather events.
- Regular Inspections: Conduct bi-annual inspections to catch minor issues before they escalate, especially after severe weather.
- Professional Maintenance: Hire roofing professionals for annual maintenance checks to ensure your roof remains in top condition and can withstand hail impacts.
- Gutter Cleaning: Keep gutters clean to prevent water backup and roof damage.
- Hail-Resistant Materials: Consider upgrading to hail-resistant roofing materials to enhance your roof’s durability.
- Trim Overhanging Branches: Regularly trim trees near your home to minimize the risk of branches falling on your roof during hail storms.
- Install Impact-Resistant Shingles: Invest in impact-resistant shingles, which can better withstand hail damage compared to standard options.
- Secure Roof Fixtures: Ensure all roof fixtures, like vents and skylights, are properly sealed and secured to prevent water leaks after hail.
🙌 Protect Your Home: Expert Roof Restoration After Hail Damage
Hail damage can be daunting, but with the right approach, you can restore your roof and protect your home. Choosing high-quality materials and regular maintenance can prolong the life of your roof.
At Clean Cut Roofing, we pride ourselves on offering top-notch services that East Texas homeowners trust. With over 30 years of experience and a commitment to craftsmanship, we’re here to assist you with all your roofing needs. Think you might have hail damage? Contact us today for a free inspection and detailed quote. Let’s ensure your roof is ready to withstand whatever Mother Nature throws its way.